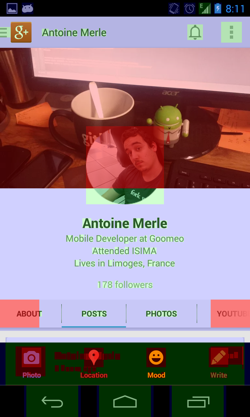
We will see here a way to make the Google Plus profile screen. I find this screen pretty interesting (although it suffers from some minor bugs), and wanted to try to find a way to do that.

Note: I won’t talk about the weird bottom bar you have to use if you want to make a new post. I hate that ‘quick return’ bar
I’ll cut this post in three parts:
- The view hierarchy
- The parallax effect
- The sticky tabs (tabs about/posts/videos, …)
The View Hierarchy
The Container

Seems obvious we have a list at the bottom of the screen. The question is: what is this header?
I see 2 options here:
- The header is not a header of the list. That means there is a FrameLayout (or anything else) containing a header and a list (with a big padding and
clipToPaddingset to false). - The header is included in the gridview as a HeaderView.
Actually, there are some hints that indicate us that the second one is more plausible:
- We can scroll by touching anywhere in the header. Hmm ok but we also could with custom views. We would probably have to change the default behavior of the tabs by overriding the
onInterceptTouchEventandonTouchEventmethods. - There is the edge effect at the top of the list. However, we could put the listView over the header in order to see the edge effect. The sticky tabs would also be visible because they are drawn after the listview’s
draw. (See part 3). - I think this is easier to do this way (especially if you want to be compatible pre ICS).
The main xml should look like that:
<GridView .../>
Hmm ok it’s a StaggeredGridView, but it’s basically the same. Don’t blame me if I call that a ListView or a GridView thereafter.
The header
Take a look at the overdraw. The header image is light red. That means pixels are drawn four times. ouch. I’m sorry but I guess it should be blue, right? I mean, there is the activity’s background, and… what else? There is obviously a perf issue here.
Note: If you want to know more about overdraws, read this post by Romain Guy.
Here is an example of hierarchy you could have:
<!-- in a real application you should use styles and dimens... -->
<RelativeLayout xmlns:android="http://schemas.android.com/apk/res/android"
    android:layout_width="match_parent"
    android:layout_height="match_parent">

    <ImageView
        android:id="@+id/header_imageview"
        android:layout_width="match_parent"
        android:layout_height="150dp"
        android:scaleType="centerCrop"
        android:adjustViewBounds="true"
         />

    <LinearLayout
        android:id="@+id/informations_container"
        android:layout_width="match_parent"
        android:layout_height="wrap_content"
        android:orientation="vertical"
        android:layout_below="@+id/header_imageview"
        android:gravity="center"
        android:paddingTop="32dp"
        android:paddingBottom="32dp">


        <TextView
            android:layout_width="wrap_content"
            android:layout_height="wrap_content"
            android:text="@string/header_name"
            android:textStyle="bold"
            android:textSize="17dp" />

        <TextView
            android:layout_width="wrap_content"
            android:layout_height="wrap_content"
            android:layout_marginTop="4dp"
            android:gravity="center"
            android:textColor="#FF707070"/>

        <TextView
            android:layout_width="wrap_content"
            android:layout_height="wrap_content"
            android:layout_marginTop="8dp"
            android:textColor="#FF909090" />

    </LinearLayout>

    <HorizontalScrollView
        android:layout_width="match_parent"
        android:layout_height="wrap_content"
        android:scrollbars="none"
        android:layout_below="@+id/informations_container"
        android:background="#FFF0F0F0">

        <LinearLayout
            android:layout_width="wrap_content"
            android:layout_height="wrap_content"
            android:orientation="horizontal">

            <!-- Here are the tabs, Just TextViews with a selector and a clickListener... -->
            <!-- There is also two views at each edge with a gradient drawable making the fade effect. But I find this pretty ugly. -->

        </LinearLayout>
    </HorizontalScrollView>

	<!-- cheat code: negative margin -->
    <ImageView
        android:layout_width="75dp"
        android:layout_height="75dp"
        android:src="@drawable/avatar"
        android:layout_centerHorizontal="true"
        android:layout_above="@+id/informations_container"
        android:layout_marginBottom="-16dp" />

</RelativeLayout>
This is basically all concerning the view hierarchy.
Note: If you want to know how to make the rounded avatar, I strongly suggest you to read an excellent post by Evelio Tarazona Cáceres.
The Parallax Effect
There is a nice parallax effect on the header image. Basically, when you scroll up your list, the image has to scroll by 0.5 * translationY instead of 1 * translationY. You cannot cancel the translation on the parent, because it’s part of the GridView so you will have to translate the image by -0.5 * translationY.
Just set a OnScrollListener like this:
@Override
public void onScroll(AbsListView view, int firstVisibleItem, int visibleItemCount,
    int totalItemCount) {
  if(visibleItemCount == 0) return;
  if(firstVisibleItem != 0) return;

  mImageView.setTranslationY(-mListView.getChildAt(0).getTop() / 2);

}
This would work. BUT:
- You don’t support pre API14 (we don’t care, but the G+ app does)
- If you use a TranslateAnimation for pre ICS devices, you will have an overdraw issue.
You just need to draw the visible part of the bitmap. Let’s create a custom ImageView, define a setParallaxTranslation method and override the draw method:
public void setCurrentTranslation(int currentTranslation) {
  mCurrentTranslation = currentTranslation;
  invalidate();
}

@Override
public void draw(Canvas canvas) {
  canvas.save();
  canvas.translate(0, -mCurrentTranslation / 2)  ;
  super.draw(canvas);
  canvas.restore();
}
Then change the call from mImageView.setTranslationY(-mListView.getChildAt(0).getTop() / 2); to mImageView.setCurrentTranslation(mListView.getChildAt(0).getTop());
EXTRA 1:
You can add a ColorFilter to add a nice effect on the ImageView:
public void setCurrentTranslation(int currentTranslation) {
    mCurrentTranslation = currentTranslation;
    float ratio =  -mCurrentTranslation / (float)getHeight();
    int color = Color.argb((int) (fMAX_COLORFILTER_ALPHA * ratio), 0, 0, 0);
    setColorFilter(color, PorterDuff.Mode.SRC_ATOP);
}
With this, the ImageView will be darker when you scroll.
EXTRA 2: If you want to make more parallax stuff on your apps, take a look at the Paralloid library by Christopher Jenkins.
The Sticky Header
Firstly, I would like to thank Flavien Laurent who helped me a lot for this part!
Note: The tabs are sticky and appear over the listView. That means this View is drawn over the GridView.
There are many ways to stick a header, and the simplest is to support only API14+ devices, which gives access to operations on Views like View#setTranslationX/Y.
1st solution: The tabs are not part of the header
This seems to be the simplest way to do it, but this won’t work very well on preICS devices (who cares?).
You activity is composed of a FrameLayout containing a ListView and the sticky HorizontalScrollView.
<FrameLayout xmlns:android="http://schemas.android.com/apk/res/android"
    android:layout_width="match_parent"
    android:layout_height="match_parent">

    <ListView
        android:id="@+id/listview"
        android:layout_height="match_parent"
        android:layout_width="match_parent" />

    <include
        layout="@layout/stickyheader"
        android:id="@+id/stickyheader" />

</FrameLayout>
The ListView will contain the header, containing a dummy view. This view needs to has the same height as your tabs.
<RelativeLayout xmlns:android="http://schemas.android.com/apk/res/android"
    android:layout_width="match_parent"
    android:layout_height="match_parent">

    <fr.castorflex.android.googleplusprofilepageapp.ParallaxImageView ... />

    <LinearLayout ... >
        <TextView ... />
        <TextView ... />
        <TextView ... />
    </LinearLayout>

	<!-- dummy view; the sticky header will be positionned here-->
    <View
        android:layout_width="match_parent"
        android:layout_height="48dp"/>

    <ImageView ... />

</RelativeLayout>
Now the only thing you need is to translate your sticky view:
mListView = (StickyListView) findViewById(R.id.listview);
mStickyHeader = findViewById(R.id.header);
mHeader = LayoutInflater.from(this).inflate(R.layout.header, mListView, false);
mListView.addHeaderView(mHeader);


mListView.setOnScrollListener(new AbsListView.OnScrollListener() {
    //...

    @Override
    public void onScroll(AbsListView view, int firstVisibleItem, int visibleItemCount, int totalItemCount) {
        if (visibleItemCount == 0) return;

        int top = mHeader.getTop();
        int tabsHeight = mStickyHeader.getMeasuredHeight();
        int headerViewHeight = mHeader.getMeasuredHeight();
        int delta = headerViewHeight - tabsHeight;

        mStickyHeader.setTranslationY(Math.max(0, delta + top));
    }
});
If you want to make it compatible preICS, do not use NineOldAndroids. NineOldAndroids is a wrapper and will use preICS animations. That means the draw of the view will be translated, but the touch events won’t be.
e.g. Imagine you have a button in 0,0 and you translate it in 150,150 with a TranslateAnimation. You will notice that if you click on 150,150 the button won’t be clicked but if you click on 0,0 the event will be called.
The only way to move your view preICS is to play with the margins. BUT you will have to call requestLayout() each time you set the new topMargin’s value. If you do that, you will notice lags. Follow this link for an example
2nd solution: Dynamically change the parent of your stickyHeader view
In this solution, the tabs are part of the ListView’s header, until we need to stick them.
This solution is better for the preICS devices, but requestLayout() will be called each time we change the parent (as we remove the view and then add it in the FrameLayout, requestLayout() will be called twice).
Here is the new Header View:
<RelativeLayout xmlns:android="http://schemas.android.com/apk/res/android"
    android:layout_width="match_parent"
    android:layout_height="match_parent">

    <fr.castorflex.android.googleplusprofilepageapp.ParallaxImageView ... />

    <LinearLayout ... >
        <TextView ... />
        <TextView ... />
        <TextView ... />
    </LinearLayout>

	<!-- we add one more container to facilitate the add/remove view -->
    <FrameLayout android:id="@+id/tabs_container"
        android:layout_height="48dp"
        android:layout_width="match_parent"
        android:layout_below="@+id/informations_container">

    	<HorizontalScrollView
        	android:id="@+id/horizontalscrollview"
       	 	android:layout_width="match_parent"
       		android:layout_height="wrap_content"
      		android:scrollbars="none"
        	>

        	<LinearLayout
            	android:layout_width="wrap_content"
            	android:layout_height="wrap_content"
            	android:orientation="horizontal">

            	<!-- tabs here -->

        	</LinearLayout>
    	</HorizontalScrollView>
    </FrameLayout>

    <ImageView ... />

</RelativeLayout>
Keep a boolean to know if you sticked your view (mIsHeaderSticked here).
mIsHeaderSticked = false;

mMainView = (ViewGroup) findViewById(R.id.main_view);
mHeader = LayoutInflater.from(this).inflate(R.layout.header, mListView, false);
mHorizontalScrollViewContainer = (ViewGroup) mHeader.findViewById(R.id.tabs_container);
mHorizontalScrollView = mHeader.findViewById(R.id.horizontalscrollview);
mListView.addHeaderView(mHeader);

//...

mListView.setOnScrollListener(new AbsListView.OnScrollListener() {
    //...

    @Override
    public void onScroll(AbsListView view, int firstVisibleItem, int visibleItemCount, int totalItemCount) {
        if (visibleItemCount == 0) return;

        boolean shouldStick = false;
        if (view.getChildAt(0) != mHeader) shouldStick = true;
        else {
            int top = mHeader.getTop();
            int tabsHeight = mHorizontalScrollView.getMeasuredHeight();
            int headerViewHeight = mHeader.getMeasuredHeight();
            int delta = headerViewHeight - tabsHeight;

            if (delta + top < 0) shouldStick = true;
        }

        if (shouldStick && !mIsSticked) {
            mIsSticked = true;
            ((ViewGroup) mHorizontalScrollView.getParent()).removeView(mHorizontalScrollView);
            mMainView.addView(mHorizontalScrollView);
        } else if (!shouldStick && mIsSticked) {
            mIsSticked = false;
            ((ViewGroup) mHorizontalScrollView.getParent()).removeView(mHorizontalScrollView);
            mHorizontalScrollViewContainer.addView(mHorizontalScrollView);
        }

    }
});
3rd solution: Just draw the horizontalScrollView, and capture touch events
This solution is great if you only have to draw a stateless view, but can be pretty hard to implement if you have views you can interact with.
The idea here is to keep the tabs in the ListView’s header, but when we need to stick it, the ListView will draw the tabs over the list.
mListView.setOnScrollListener(new AbsListView.OnScrollListener() {
    //...

    @Override
    public void onScroll(AbsListView view, int firstVisibleItem, int visibleItemCount, int totalItemCount) {
        if (visibleItemCount == 0) return;

        boolean shouldStick = false;
        if (view.getChildAt(0) != mHeader) shouldStick = true;
        else {
            int top = mHeader.getTop();
            int tabsHeight = mHorizontalScrollView.getMeasuredHeight();
            int headerViewHeight = mHeader.getMeasuredHeight();
            int delta = headerViewHeight - tabsHeight;

            if (delta + top < 0) shouldStick = true;
        }

        //sticky header
        if (shouldStick)
            mListView.setViewToDraw(mHorizontalScrollViewContainer);
        else
            mListView.setViewToDraw(null);
    }
});
In your custom ListView, provide a setViewToDraw method:
public void setViewToDraw(View viewToDraw) {
    if (mViewToDraw == viewToDraw) {
      return;
    }

    mViewToDraw = viewToDraw;
    invalidate();
}
and override the dispatchDraw:
@Override
protected void dispatchDraw(Canvas canvas) {
    super.dispatchDraw(canvas);
    if (mViewToDraw == null) return;

    mViewToDraw.draw(canvas);
}
Your tabs should stick now but you cannot interact with them. Here is what I did, but unfortunately it doesn’t work very well, as I am unable to make the fling work… If you have any idea on how to improve it, please do not hesitate to contact me.
Firstly create an enum with the different states:
private enum TouchState {NONE, TOUCHING_HEADER}
private TouchState mTouchState = TouchState.NONE;
Then override the dispatchTouchEvent
@Override
public boolean dispatchTouchEvent(MotionEvent ev) {
  if (mViewToDraw == null) {
    return super.dispatchTouchEvent(ev);
  }

  int bottom = mViewToDraw.getMeasuredHeight();
  boolean captured = false;
  boolean invalidate = false;

  switch (ev.getAction()) {
    case MotionEvent.ACTION_DOWN:
      if (ev.getY() <= bottom) {
        mTouchState = TouchState.TOUCHING_HEADER;
        invalidate = true;
        captured = mViewToDraw.dispatchTouchEvent(ev);
      }
      break;
    case MotionEvent.ACTION_CANCEL:
    case MotionEvent.ACTION_UP:
      if (mTouchState == TouchState.TOUCHING_HEADER) {
        mTouchState = TouchState.NONE;
        invalidate = true;
        captured = mViewToDraw.dispatchTouchEvent(ev);
      }
      break;
    default:
      if (mTouchState == TouchState.TOUCHING_HEADER) {
        invalidate = true;
        captured = mViewToDraw.dispatchTouchEvent(ev);
      }
  }

  if (invalidate) {
    invalidate(0, 0, getWidth(), bottom);
  }

  if (captured) {
    return true;
  }

  return super.dispatchTouchEvent(ev);
}
If you want to use this solution, you will clearly need to improve my implementation.
4th solution: Duplicate the Tabs view and just make it visible/invisible
This is not a really great way to implement the sticky tabs but this will work and you will avoid the calls to requestLayout()
You will need to copy paste the tabs view in the header’s xml and in the main view’s xml
mListView.setOnScrollListener(new AbsListView.OnScrollListener() {

    @Override
    public void onScroll(AbsListView view, int firstVisibleItem, int visibleItemCount, int totalItemCount) {
        if (visibleItemCount == 0) return;

        boolean shouldStick = false;
        if (view.getChildAt(0) != mHeader) shouldStick = true;
        else {
            int top = mHeader.getTop();
            int tabsHeight = mHorizontalScrollView.getMeasuredHeight();
            int headerViewHeight = mHeader.getMeasuredHeight();
            int delta = headerViewHeight - tabsHeight;

            if (delta + top < 0) shouldStick = true;
        }

		//refresh the scrollY and the visibility
        if (shouldStick && !mIsSticked) {
            mIsSticked = true;
            mStickyTabs.setScrollY(mTabsInHeader.getScrollY());
            mStickyTabs.setVisibility(View.VISIBLE);
        } else if (!shouldStick && mIsSticked) {
            mIsSticked = false;
            mTabsInHeader.setScrollY(mStickyTabs.getScrollY());
            mStickyTabs.setVisibility(View.INVISIBLE);
        }

    }
});
Please note this solution is not a great solution because you have duplicate views, and you will have to set twice your clickListeners.
Here is the overdraw of the sticky tabs:

We can notice the view is drawn twice, so I bet they use the solution 3 or 4.
Conclusion
I showed you 4 ways to make this screen:
- The tabs are in the main view’s xml, and we use the setTranslationY method to make it move (playing with margins on pre ICS devices)
- The tabs are in the listview’s header, and we change the tabs container’s parent when we need to stick it (but this calls requestLayout twice)
- The tabs are in the listview’s header, and we just redraw them over the list when we need to stick them (but the touch events are pretty hard to implement)
-
The tabs are both in the main view and the listview’s header, and we play with setVisibility(INVISIBLE VISIBLE), but we have a duplicated view, and we need to set clickListeners twice for each tab.
I was incapable to find a ‘good’ way to implement that sticky tabs but if you have any idea, please do not hesitate to comment or contact me! And if you don’t, then share it!
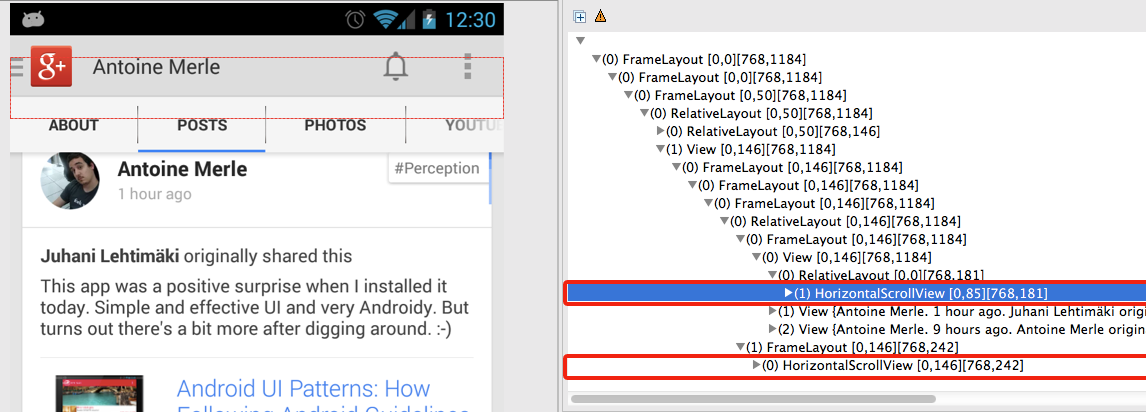
Edit
Thank you, Wolfram Rittmeyer for suggesting me to use uiautomatorviewer and see how they actually make it in the google plus app. I discovered they use the solution #4. Indead, the tabs are in the header and in the FrameLayout containing the ListView. They just turn the visibility of the HorizontalScrollView to VISIBLE/INVISIBLE.